How to Find the IP Address of Your iPhone

How to Find the IP Address of Your iPhone

ts a pretty simple procedure to find the IP Address of your iPhone but you will need to do this anytime you want to SSH into your phone. Follow the instructions below to get started.
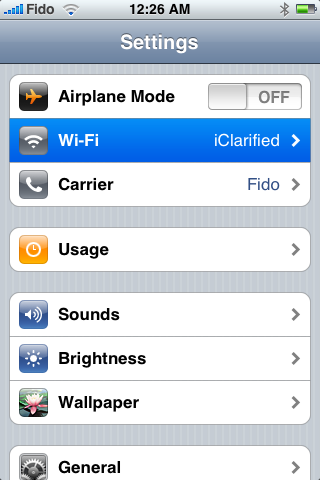
Step One
Press to select Settings from your SpringBoard


Step Two
Press to select Wi-Fi from the Settings menu.
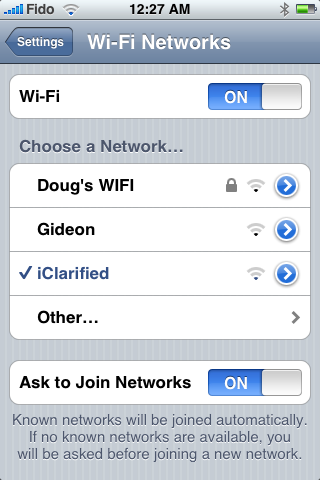

Step Three
Press to select your network if it isn't already selected. Then next to your network name press the blue circle with the arrow in it.
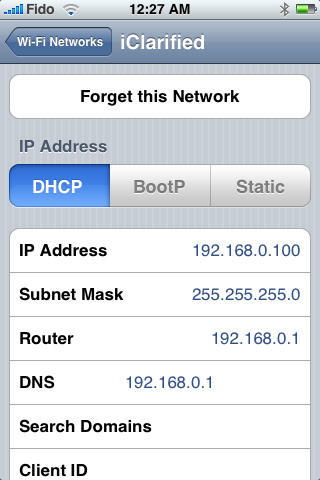

Step Four
You will now be displayed your iPhone's IP Address!

How to Create Custom iPhone Ringtones Using GarageBand

How to Create Custom iPhone Ringtones Using GarageBand


With the latest release to GarageBand you can now create your own ringtones and export them directly into iTunes! These ringtones can then be easily synced to your iPhone.

Step One
If you have not updated your GarageBand then do so by selecting Software Update from the Apple menu at the top left of the screen. Alternatively you can download the GarageBand update directly from here: http://www.apple.com/support/downloads/ ... nd411.html.

Step Two
After you have installed the GarageBand update you can launch the program by clicking its icon in the dock.


Step Three
If prompted by an introductory screen, click Ok.


Step Four
Click to select Create New Music Project from the popup menu that appears. If this menu does not appear and you go straight into GarageBand then select New from the File menu to get this menu.


Step Five
New Project dialog will appear. Enter the name of your ringtone into the Save As entryfield then click the Create button.


Step Six
GarageBand will now open with a default Grand Piano Track and a Digital Keyboard. Click the red circle at the top left of the keyboard to close it. Now select the Grand Piano track and select Delete Trackfrom the Track menu to remove it. You should now have a blank project to work with.


Step Seven
Open a new Finder window by selecting its icon in the dock. Navigate to the location of the song you would like to use as a ringtone. Drag this file into the GarageBand window. You will notice that a new track has been created for the song.


Step Eight
Click the Cycle Region button to the right of the Fast Forward button.


You will notice that a small region has been added across the top of your newly added track. A portion of this region is highlighted in orange. This is the cycle region and for our purposes is the region we use to define our ringtone.


Step Nine
Select Show Time in LCD from the Control Menu.


Notice the Timeline is now shown in minutes and seconds rather then in measures.


Step Ten
Take your mouse and create a cycle region which spans the section of the song you would like to use as your ringtone. Do this by dragging the mouse across the top of the song region you want to select. Once you have made a basic selection you can fine tune it by dragging the ends of the orange bar. 


Step Eleven
Use the Zoom control to help you fine tune you selection. 


If you want to be even more exact you can use the Track Editor to see the track in more detail. 


Step Twelve
Use the Play button to preview your selection to make sure it sounds right.


Step Thirteen
We are now going to add two effects to the track. We do this to optimize the track for playback on the iPhone. You do not have to do this and could just skip to Step Sixteen. I would suggest applying these steps because with most tracks the iPhone distorts the sound terribly.

Now with the track still selected click the Track Info button. 


At the bottom left hand corner of the Track Info window click the Details button.


Step Fourteen
Check the box next to the Compressor effect and then select a compressor type. I selected Vocal Compression Basic. You could select whichever you think works best.


You may get prompted to confirm the change. If so, click the Continue button.


Step Fifteen
From the dropdown menu below Compressor select AUHipass


Click the Pencil Button at the right to bring up the Manual Settings dialog. Enter a cutoff frequency of around 150. You can play around with this setting; however, 150 seems to take care of the bass distortion on my iPhone. Click the red circle at the top left of the popup window to close it.


Step Sixteen
Listen to the track again to make sure it sounds good. Click Send Ringtone to iTunes from the Share menu.


Step Seventeen
The ringtone will export to iTunes and will be added to your ringtone list.


Step Eighteen
Connect your iPhone to the computer and select it from the list of devices on the left.

Step Nineteen
Select the Ringtone tab and make sure your ringtone is selected for synchronization. You can then click the Sync button.


Your ringtone will now appear on your iPhone's Ringtone list!


How to use your iPhone to check weather conditions

How to use your iPhone to check weather conditions


These are instructions on how to use your iPhone to check weather conditions. This is a basic tutorial but for those of you just setting up your iPhone it may help.

Step One
Press to select the Weather icon from your iPhone SpringBoard.


Step Two
If this is the first time you are setting up your Weather application then it will default to Cupertino. Press the small i button at the bottom right of the screen.


Step Three
You will now be presented with a list of the cities for which you can check weather.


Step Four
To delete a city (ie Cupertino) press the red "Do Not Enter" button at the left side of the city name. ADelete button will then appear. Press it to remove the city from your list.


Step Five
To add a city press the + button at the top left hand corner of the screen.


The Add Location window will appear. Type in the name of your city then press the Search button.


Now a list of possible results will appear. Press to select the correct location.


Notice the city now appears in your list of Weather Locations. You can continue to add more cities if you like.


Step Six
You can drag the handles at the right of each location to order the cities in your list. At the bottom of your weather list you can choose between Celsius and Fahrenheit using the two large buttons. Then press the Done button at the top right to finish your changes.


Step Seven
You will now be taken to the weather conditions for your chosen city! You can swipe to move between cities on your list.


How to create an iPhone Applications Bundle using iBuilder.

How to create an iPhone Applications Bundle using iBuilder.


These are instructions on how to create an iPhone Applications Bundle using iBuilder. This app lets you bundle multiple applications together for easy quick installation on your iPhone. 

Currently you will need to run iBuilder on a Windows machine and then copy the created bundle over to PwnageTool (Mac) for use. 

Step One
Download iBuilder from here to your desktop.

Step Two
Extract the downloaded zip (iBundle1.02b.zip) to your desktop.


Step Three
Double click iPhoneBundleBuilder.exe from the extracted folder (iBundle1.02b).


Step Four
iBuilder will launch and display a list of sources and packages


Step Five
To add a source enter its url into the entryfield then click the Add Source button.


Step Six
Notice the new source is added to the Sources listbox.


Step Seven
Double click a package to add it to the User Packages listbox. Once you have added all the packages you desire, click the Build! button.


Step Eight
When your custom bundle has been built it will be saved to the Desktop in a folder called iBuilder.bundle. Click the OK button.


MAC USERS
To use this bundle you must transfer it to your Mac. Hold down the CTRL key and click the PwnageTool icon. Click Show Package Contents from the popup menu.


Now navigate to Contents > Resources > InternalPackages and copy the iBuilder.bundle into it.


You can now follow this tutorial to not only add custom logos to your firmware but also include the iBuilder.bundle


THANKS***: A big thanks to Rotem925 for creating this application. You can support his work using the donate button in iBuilder!